Cloud Options
Select a provider, deploy a GPU instance, open port 49200 for inbound TCP, and SSH in. Every section below follows the same pattern; what differs is pricing, how the external port is exposed, and provider-specific requirements.
Overview
| Provider | Cheapest 24 GB GPU | External port | Caveats |
|---|---|---|---|
| AWS | NVIDIA L4, 24 GB (g6.8xlarge) |
Standard firewall | — |
| GCP | NVIDIA L4, 24 GB (n4-highmem-16) |
Standard firewall | — |
| RunPod | RTX 4090, 24 GB | Random → set --announce_port |
Workspace runs in Docker → use conda; apt update first |
| Vast.ai | RTX 4090, 24 GB | Random → set --announce_port |
Community marketplace: verify host reliability before long runs |
| Tensordock (Distributed) | RTX 4090, 24 GB | Random → set --announce_port |
NVIDIA toolkit + Docker need installing |
| Lambda Labs | NVIDIA A10, 24 GB | Standard firewall | — |
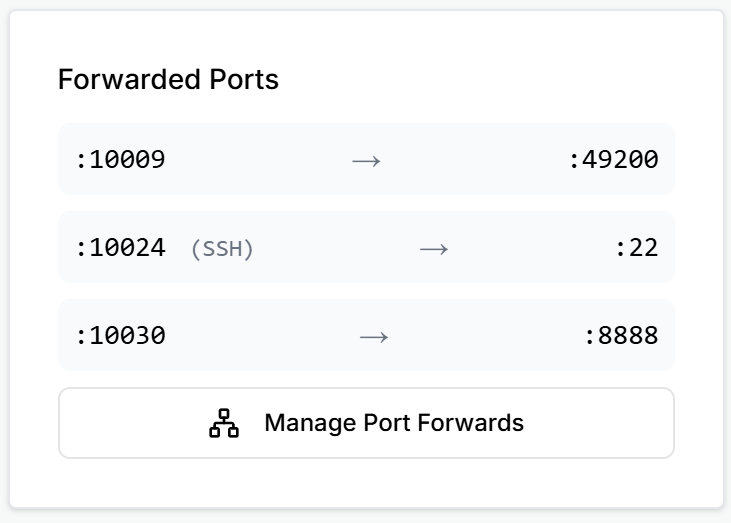
Random external ports need --announce_port
RunPod, Vast.ai, and Tensordock assign a random external port that differs from the internal 49200. Pass both --host_port 49200 and --announce_port <external> when launching Agora so peers reach you at the right address. Standard-firewall providers (AWS, GCP, Lambda Labs) keep the port as-is.
AWS (Amazon Web Services)
AWS offers a wide range of GPU options; the cheapest 24 GB option that also meets the 80 GB RAM requirement is g6.8xlarge (NVIDIA L4, 24 GB VRAM, 32 vCPU, 128 GB RAM).
- Log in to the AWS Management Console.
- Launch an EC2 instance:
- Pick an AMI with NVIDIA drivers + CUDA + PyTorch (e.g.
Deep Learning OSS Nvidia Driver AMI GPU PyTorch 2.7 (Ubuntu 22.04)). - Pick an instance type with at least 24 GB VRAM and 80 GB RAM (e.g.
g6.8xlarge(L4) org5.8xlarge(A10G)). - Create or select a key pair (download the
.pemfile if new). - Set storage to at least 80 GB.
- Pick an AMI with NVIDIA drivers + CUDA + PyTorch (e.g.
-
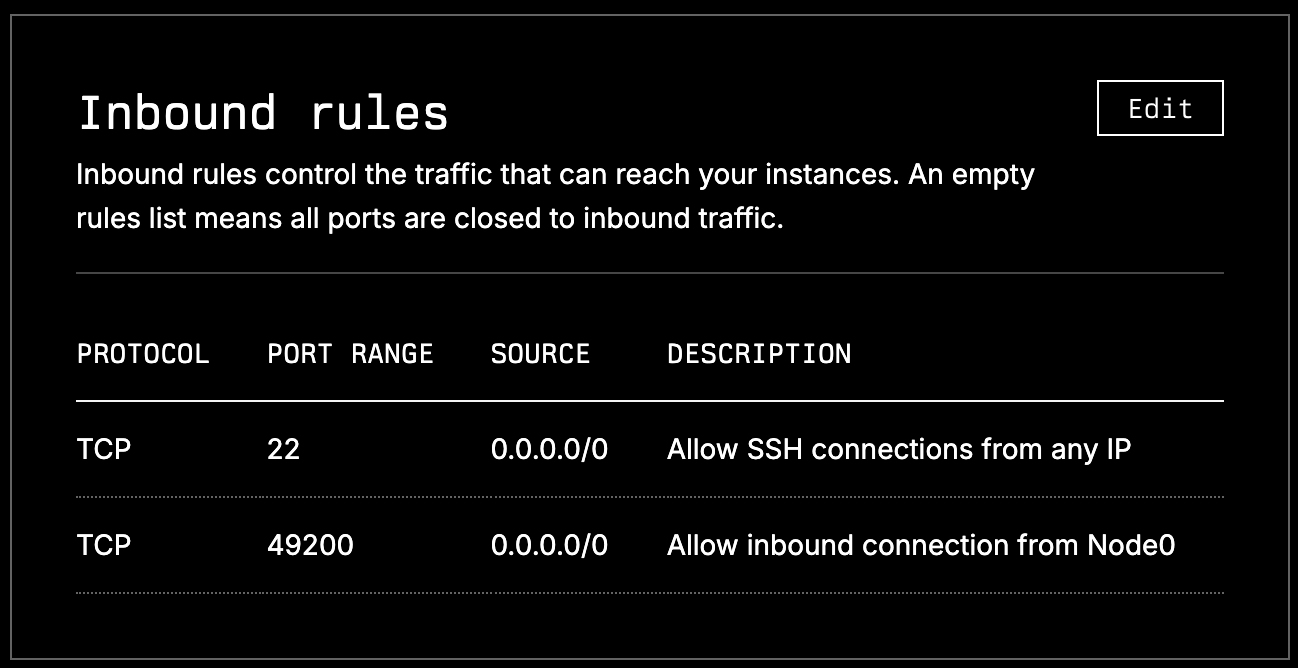
Open port 49200 on the instance's Security Group:
- EC2 → your instance → Security tab → click the attached Security Group.
- Inbound rules → Edit inbound rules → Add rule.
- Type:
Custom TCP, Port range:49200, Source:0.0.0.0/0.

-
SSH in:
GCP (Google Cloud Platform)
Cheapest 24 GB configuration: an NVIDIA L4 (24 GB VRAM) on n4-highmem-16 (16 vCPU, 128 GB RAM).
- Log in to the Google Cloud Console.
- Create a VM instance:
- Compute Engine → VM instances → Create Instance.
- Switch from General Purpose to GPUs, pick
NVIDIA L4+n4-highmem-16. - OS and storage: pick a CUDA + PyTorch image (e.g.
Deep Learning VM for PyTorch 2.4 with CUDA 12.4 M129). - Security → Manage Access → add your SSH public key.
- Click Create.
-
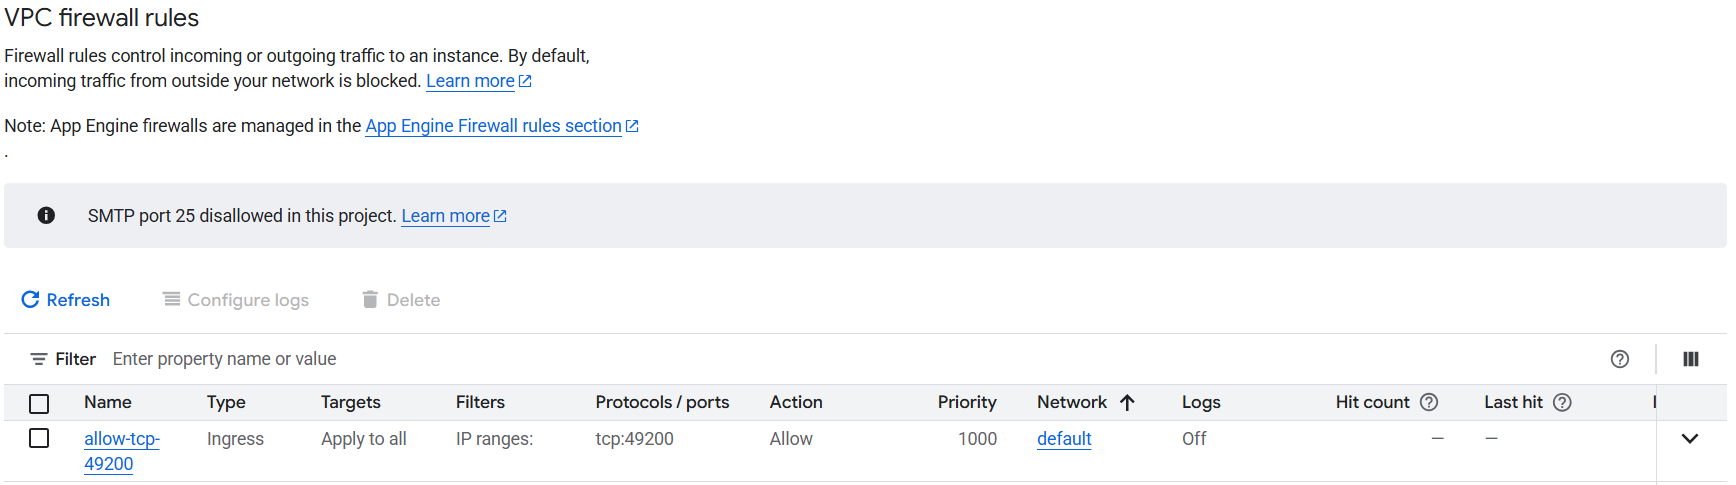
Open port 49200 as a VPC firewall rule:
- VPC network → Firewall → Create firewall rule.
- Target: "All instances in the network" (or use "Specified target tags" and tag your instance).
- Source IPv4 ranges:
0.0.0.0/0. - Protocols and ports: "Specified protocols and ports" → TCP
49200.
-
SSH in: find the external IP under instance details:
RunPod
Cheapest 24 GB option: RTX 4090, 24 GB VRAM, ≥80 GB RAM, 8 vCPUs. RTX A5000 is a valid cheaper 24 GB alternative if 4090 availability is limited.
Workspace runs in Docker
RunPod's workspace itself is a container, which makes Docker-in-Docker impractical. Use conda instead; see Useful Links → Environments.
Most standard packages are not preinstalled; run apt update before installing anything.
- Log in to the RunPod Console.
- Add an SSH key: Settings → SSH Public Keys. If one is not already set up, follow RunPod's SSH guide.
- Deploy a Pod: we recommend our template, which preconfigures CUDA + PyTorch and exposes port
49200. Otherwise:- Pick a GPU (e.g. RTX 4090, RTX 5090).
- Choose Pod Template Our template, or similar CUDA + PyTorch image with Python 3.11 with disk set to ≥80 GB.
- Ensure SSH Terminal Access is enabled.
- Click Deploy On-Demand.
-
Expose port 49200: RunPod will map it to a random external port:
Using our template?
Our template already exposes port
49200, so you can skip substeps a–b below. You still need substeps c–d to read off the random external port and pass it to Agora as--announce_port.-
(Non-template images only.) Open Pod settings (three horizontal lines on the pod card) → Edit Pod.
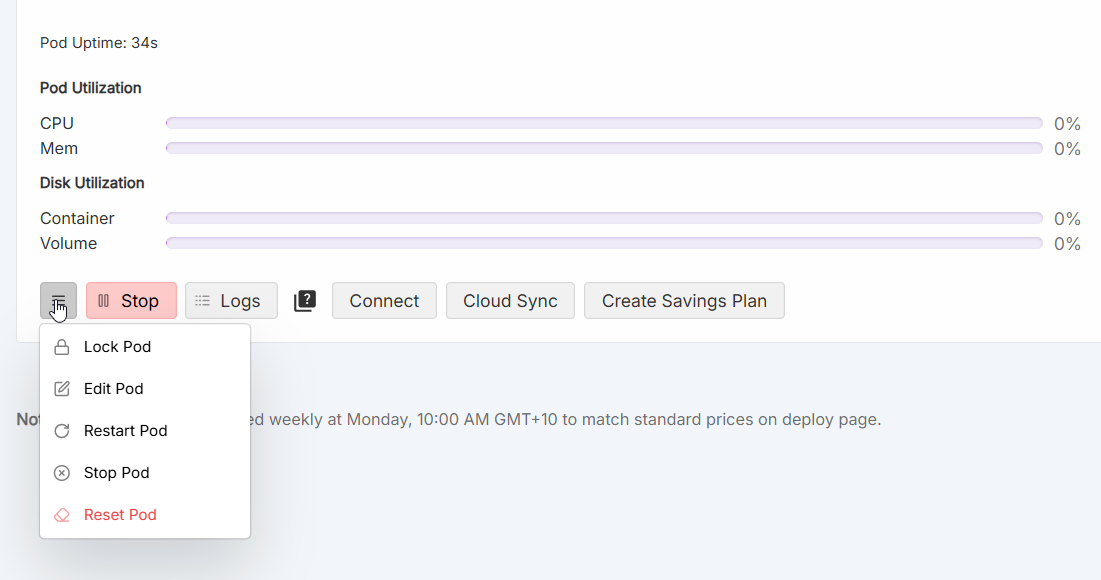
-
(Non-template images only.) Under Expose TCP Ports add
49200and save (this restarts the pod).
-
Once restarted, click Connect to read the external port mapping for
49200(the example below uses17969).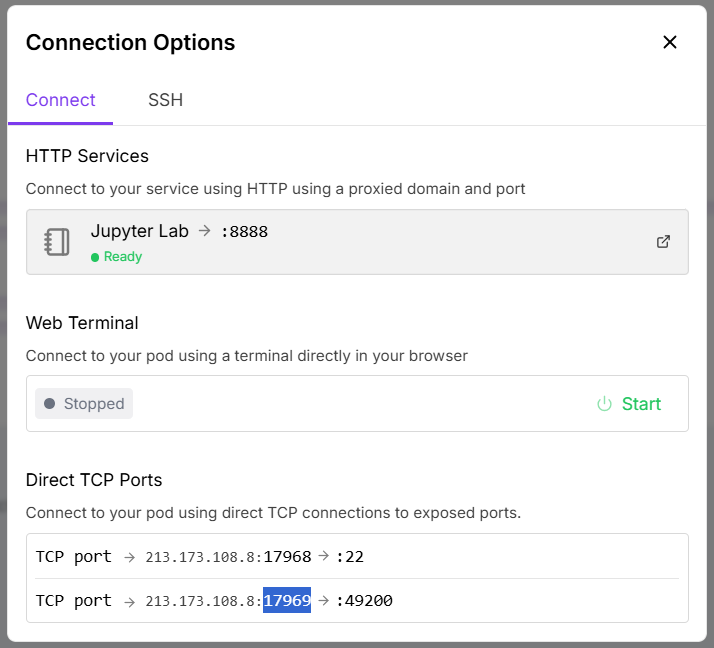
-
Pass both ports when launching Agora:
-
-
SSH in: Pod → Connect → SSH tab → use the "SSH over exposed TCP" command.
-
Upgrade your packages and dependencies: before running Agora, ensure
pip==25.3,torch==2.7.0+cu128.
Vast.ai
Cheapest option: RTX 4090, 24 GB VRAM, community marketplace. RTX A5000 listings are typically cheaper but come from less reliable hosts.
Community hosts: verify reliability
Vast.ai is a marketplace of independent hosts. Prices are substantially lower than hyperscalers but uptime and network quality vary. Check the host's reliability score (≥99%) and DLPerf number before committing to a long run. Random external port is assigned; pass both --host_port 49200 and --announce_port <external>.
- Log in to the Vast.ai console.
- Add an SSH key: Account → SSH Keys.
- Choose a template: we recommend our template, which preconfigures most of the required setup. Alternatively, pick
PyTorch (cuDNN Runtime)or similar CUDA + PyTorch image with Python 3.11, set disk to ≥80 GB. -
Select a machine and launch: filter offers by GPU, minimum
RTX 4090, sort by price, and pick a host with reliability ≥99% and at least 80GB ram, applying your chosen template from step 3.Using our template?
Our template already includes
-p 49200:49200in its Docker run options, so you can launch directly — skip substep 1 below.-
(Non-template images only.) Open Edit Image & Config on the offer card and add to Docker create/run options:
Save the template.
-
Launch in SSH + TCP mode (not Jupyter).
Pick
-p, notEXPOSEVast.ai's image-config editor sometimes also surfaces an "Open Ports" /
EXPOSElist; that field only documents the port in image metadata, it does not publish it. The-pargument in the docker run options is what creates the external mapping. -
-
Get the external port and connect: Vast.ai maps
49200to a random external port via Docker.-
After launch, click IP & Port Info on the instance card. The output shows lines like:
Here
33526is the external port. (The container also exposes the value viaecho $VAST_TCP_PORT_49200.) -
SSH in: instance card → SSH command.
-
Pass both ports when launching Agora manually, or via the CLI:
-
-
Upgrade your packages and dependencies: before running Agora, ensure
pip==25.3,torch==2.7.0+cu128.
Tensordock
Cheapest 24 GB option: RTX 4090, 24 GB VRAM, 80 GB RAM, 8 vCPUs.
Distributed Compute → random external port
Tensordock's Distributed Compute option assigns a random external port that differs from the internal one. Pass both --host_port 49200 and --announce_port <external> when you launch Agora.
- Log in to the Tensordock Deploy Dashboard.
- Add an SSH key: Secrets → Add Secret → type
SSH Key, paste your public key. For SSH key generation instructions, see guides for Windows or Linux. - Deploy a GPU:
- Deploy GPU → pick a GPU (e.g. RTX 4090).
- Configure CPU, RAM (≥80 GB), storage (≥80 GB), location.
- Pick OS:
Ubuntu 24.04 LTSis recommended. - Click Deploy Instance.
-
Configure port forwarding during provisioning: under Port Forwarding click Request Port and enter
49200. After deploy, note the assigned external port.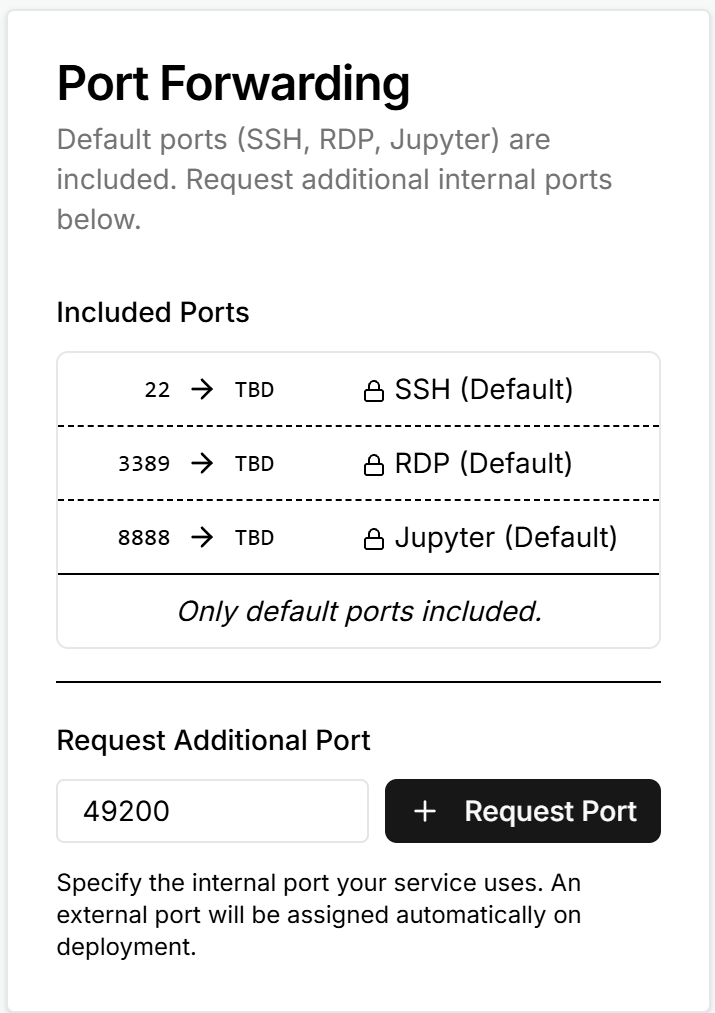
Pass both ports when launching Agora;
--announce_portis the external port: -
Connect: My Servers → click the instance → Access section has the SSH command.
Optional: install NVIDIA toolkit + Docker
Tensordock instances often come without the NVIDIA container toolkit or Docker. To install both:
Docker itself, if missing:
sudo apt install apt-transport-https ca-certificates curl software-properties-common -y
sudo curl -fsSL https://download.docker.com/linux/ubuntu/gpg -o /etc/apt/keyrings/docker.asc
echo "deb [arch=$(dpkg --print-architecture) signed-by=/etc/apt/keyrings/docker.asc] https://download.docker.com/linux/ubuntu $(. /etc/os-release && echo "$VERSION_CODENAME") stable" | sudo tee /etc/apt/sources.list.d/docker.list > /dev/null
sudo apt update
sudo apt-get install docker-ce docker-ce-cli containerd.io docker-buildx-plugin docker-compose-plugin -y
sudo groupadd docker
sudo usermod -aG docker $USER
Lambda Labs
Lambda is positioned between hyperscalers and community marketplaces: managed bare-metal GPUs with simple pricing. Cheapest 24 GB option: A10 (24 GB VRAM, 30 vCPUs, 200 GiB RAM).
- Log in to Lambda Cloud.
- Add an SSH key: SSH Keys → add your public key.
- Launch an instance: Instances → Launch an Instance → pick the GPU (e.g. 1× A10), pick a region and FileSystem (or create one), click Launch.
-
Open port 49200 in Lambda's firewall:
- Cloud dashboard → Firewall → Edit in the Inbound Rules section.
- Add a rule: Rule type
Custom TCP, Port range49200, Source0.0.0.0/0.
 5. SSH in: once the instance is up, copy the command from the SSH Login field.